This blog post is the third in a series, describing how app development works in a typical client-agency arrangement. The intended reader for these posts is someone who is looking to get an app made, who wants to know how the process works. This series covers how you might work with an agency to build an app, and incorporates some of our learnings from our previous projects on what tends to work best.
Ideation and Design covers the process of designing and refining the features that the app will contain, based on the gathered requirements. As mentioned in our last post, Requirements Gathering and Ideation and Design are often completed together iteratively.
User Stories
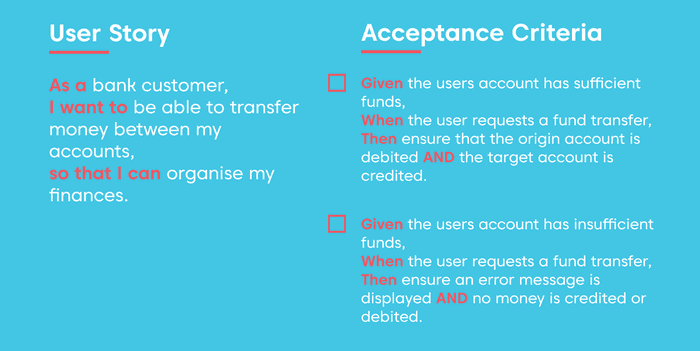
The first step in the ideation process is creating a well-defined set of User Stories. User Stories are a way of expressing a requirement that ties it back to the kind of user, as well as explaining the reasoning behind the requirement. Typically, a user story follows the pattern:
“As a [kind of user]
I want to [perform a task or use a functionality]
So that I can [get a benefit or achieve a goal]”
This then leads to an Acceptance Criteria, which is essentially a “test criteria” – something that can be easily tested to see if the functionality described by the User Story is being met. An Acceptance Criteria has the pattern:
“Given [a beginning state or context],
When [I perform an action],
Then [an observable action(s) happens]”
User stories are valuable as an initial step that a) solidifies your ideas on what is required and b) creates something that can be checked off as you develop your designs.
Story Epics
An important thing to note is that in large projects, the steps we’re describing will be iterated on multiple times, with multiple phases of design and development. In these cases, it often makes sense to hold off on distilling all your gathered requirements into User Stories – as you’ll probably keep learning about your requirements as the project progresses, instead, requirements are left as ‘Epics’.
Epics are generally less structured than User Stories, but they describe an overview of what is needed, often in the form of product, technical and design requirements. As a typical example, you might have an Epic titled ‘Sharing’. This Epic might describe all the requirements that have been identified for sharing content within your application. Such as whether the shared content needs to be able to be accessed by someone who doesn’t have the app.
As project sprints get completed, and features are developed, Epics should be revisited, and broken up into user stories, informed by the knowledge you have from developing the app so far. In the example above, you might find that decisions made during development now require you to implement sharing in a certain way, which can inform how you write your User Stories.
User Flows
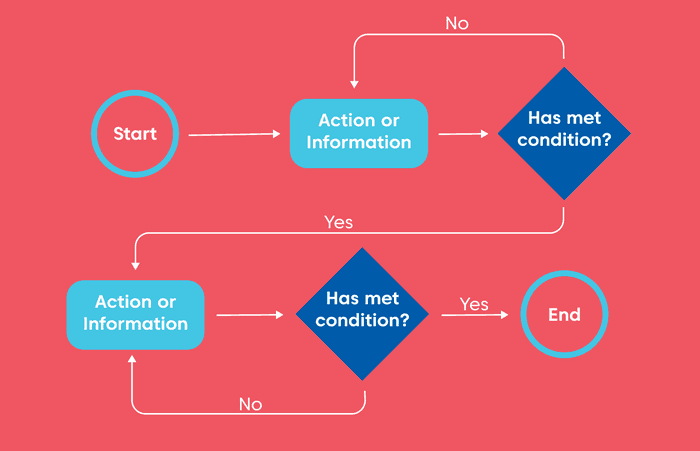
A typical step after writing User Stories is to identify and write down User Flows. User Flows are diagrams that show the steps that a user would take from beginning to end of trying to do a certain action. A User Flow would typically take the form of a flow diagram, such as the one shown in the image below. Some agencies might show User Flows in the form of very rudimentary app screens instead, to help with imagining the process.
Developing your User Flows is important in working out how varying user decisions might branch into different pages or UI (User Interface(s)), as this can be a source of a lot of complexity in an app. They also allow the app's designers to start identifying edge cases, and if they might be able to be eliminated through fine-tuning the user flow. User flows still need a lot of work to turn into UI, but they can save a lot of time down the line as unnecessary UI can be identified early.
Wireframe Designs
Wireframe designs are a typical next step, especially for larger projects. Wireframe designs (aka Low-Fidelity Designs) are designs that aren’t intended to show exactly how pages within an app will look in detail; instead, they show the general layout and structure of the content. Since they don’t require the level of detail that you’d see in a finished product, wireframe designs are faster to produce and revise. Wireframes are typically either made with wireframing software, or with pen and paper.
Wireframe designs are often used to make sure the general layout and UI are functional and make sense to the planned users before the time is spent on high-quality designs. In cases where user feedback is gathered, it can be helpful to use software tools to create “click-through” prototypes that mimic the functionality of a real app using just the designs.
Wireframe designs are also where app designers can start thinking about responsive app designs, which are designs that consider all different screen sizes and aspect ratios. A design that works on a Desktop screen, may not be appropriate for a mobile device. Responsive designs are especially important if an app is going to be built for both mobile and web, although even in the case of mobile-only projects, it is a factor, as you may want to support iPad sized screens.
High-Fidelity Designs
Next up, high-fidelity designs of the app are created. These designs consider your business branding and are intended to be ‘pixel-perfect’, in other words, they look exactly as your finished app would. This is important to save developer time, as any issues or flaws can be worked out, while the app still exists purely as design files.
As with wireframe designs, the high-fidelity designs can be used to create click-through prototypes. These can generally be created directly using common app design tools like Figma, Invision or Sketch. These are very valuable as with the high-fidelity designs, they can provide an accurate facsimile of the eventual app experience.
Validation
Finally, designs must be validated. This isn’t necessarily something that needs to wait for high-fidelity designs but can be a continuous process as the various assets in the Ideation and Design process are created.
In many cases, the previous stage in the app development process, Requirements Gathering, and Ideation and Design are combined, into a single iterative design process. When structured like this, app designers have the opportunity to take potential designs at every stage and test them with real users, all the while trying to discover further requirements which might only be visible now that earlier stages have been worked through.
At Lab3, we call this combined iterative process phase ‘Design and Scoping’, and it’s typically a process that we start all new projects with. The additional outcome of these two stages being complete is that your app development team now has everything they need to be able to give a more detailed and accurate estimate for the costs to develop the project, and on some projects, they may be able to complete the development work at a fixed price.
Adapting for Scale
As we touched on in our discussion of User Story Epics, large projects simply cannot handle all design work before development starts. In large projects, these steps will be largely the same, but the outcome will be designs for only a subset of the planned final app. Further design work will be done as development work is completed, and further business and user requirements are investigated and developed.
At the end of this process, your understanding of the product you’re building and the scope of work required to actually build it should hopefully be much clearer. In our next post, we’ll be touching on some of the key decisions that can affect the development process, and how you might approach making the right choices.


